Search This Blog

Search This Blog

Sunday, 15 December 2013

The Ultra large Shot gun pen:

The Ultra large Shot gun pen:


I had sometime back,  seen a Pilot Maki art pen in some airport showroom that was really very much oversized. Kept wondering for days as to what size of a hand would be needed to use that large pen.  Anyway, I had been contemplating for days to make one similar sized pen  and last couple of days that idea seized me.

Now at home I do not have a lathe, so kept thinking how to make one. Well I had a few part finished kit-less pens lying with me and searching for the largest kit, I found a Shotgun kit. Let us try.

 
This was the kit-less part finished one that  I chose- it was made with a thick brass tube cap and aluminum tube barrel, the external part of the barrel tube were threaded for the cap, both ends. To use this  with the kit required me to cut off the barrel extensions and using a hand reamer to bring the aluminum tube to correct size for fitting the couplers from the kit. The process took me half a day and sore hands but at the end the barrel tube came off at the glue leaving the wooden sleeve. That was good in a way, I could use the brass tube from the kit and with no further re-sizing could fit the couplers. To the pen body is ready.
For the cap : this brass tubed cap already had a brass collar, adding the cap part ferrule would give a excessively long cap band. What to do- but I kept it because I wanted a long pen. I managed to find a die-grinder at home and the size moderation in side the tube to fit the kit part was not much difficult.
So in effect the pen was ready, only needed a little more polish.
Now I wanted to try one more technique , that is , a simple inlay design. My daughter helped, she is good at drawing. A simple vine branch with a few leaves. This pattern was drawn with a pencil first and made 0.5 mm deep grooving using curving knives. The grooves were filled up using a microtip permanent marker- chosen black colour , in retrospect green would have been more lively.
Now comes the hard part. These grooves with the permanent ink fill and the body in general were coated with CA. Five successive layers were given with drying and rough sanding in between and finally a full sequence eight grade hand polish by micromesh stick. Did three sets of this treatment to finish. Lots of time and struggle as I did not use a lathe!
The finished pen looked somewhat close to what I imagined. But the wood part brightness became darkened due to a minor part of the ink dissolving in the CA and a small amount of brass getting mixed.
 

 Compared with a standard sized shotgun pen: This pen is 18 cm long , capped!


The design by hand  :
 Close up :
 
 
I

Inspected closely by a lense, there are very small pores on the surface. This is on the top CA layer. Later I would give  more coats of CA and mix a lemon yellow dye to the CA to eliminate the blackish hue.
 
Generally happy with what I started out to do, here is this oversized Shotgun pen.
Definitely not a practical writer, perhaps none in this size are. But does look good as a showpiece.  Welcome comments and critiques.

Over & Under Shotgun Kit Pen- Revisit.

Over & Under Shotgun Kit Pen- Revisit.

I had detailed about this shotgun  kit pen earlier in this link :
Still do not understand why this kit is called Over & Under!
Most  other  pens I have seen  made on this hardware come in two colours , different for the barrel and the cap. But I had chosen same colour for the barrel and cap. Actually this material is not wood but bamboo.  I took an old sledge hammer handle piece and machined the blank out of it- a piece of scrap on board ship that would have been incinerated anyway!

The  finish used on this pen was 6 to 7 coats of CA after graded sanding and later finishing the CA with grit 600, 1200 and final buffing using all eight grades of micromesh stick finally upto grit 12000. After all that done the pen does not look very impressive to me, but is a hot favourite with my daughter- how widely person to person likings differ!  The pen body however has a very smooth tactile feel.

The writing experience with this pen is good but the pen is a bit too large for my hands , particularly after posting the top heavy cap. I would wish the section was made curved rather than parallel. However I am sure many others like this pen. The original nib was very smooth, but this pen had fallen down on the tip and got damaged. Since then it has taken me too long to go through cycles of repair, grinding and smoothing. Finally now the pen writes good again. But the damage has created small corrosion areas near the tip of the nib [ please see the macro shot].


Though personally this is not my most liked writing instrument, I like this pen for the impressive looks of it. I was fun to inspect this pen after a few months.
Pasted here is a handwriting sample and some recent photos of this pen.


Look the back of the nib-small pitting corrosion marks, these appeared after the damage repair!

Thursday, 12 December 2013

Apollo Infinity Kit- copper body pen- Revisit.

Apollo Infinity Kit- copper body .

This is a kit pen , made from Apollo infinity Chrome kit.  Originally I had made a wooden  pen using this kit [ a photo is given] but somehow did not like the fat looks. So broke that up to salvage the kit and in the process destroyed the brass tubes. As you don’t get any supplies on the ship, I decided to make a tubeless body. By now I had turned many brass rods , so wanted another material. Took up a pure copper  rod- only learn later how difficult machining copper can get!  If  you are turning or drilling at slow speed the tool tip or drill bit will stick and braek [ I was not using any coolant] and if you raise the turning speed the metal will over heat and the shavings will melt and stick [ unlike brass] and eventually the hot job-piece would bend. Given a choice, I would not make another pen like this again. !!
The pen came out in good shape, fit and finish. But bad luck, it popped out of my boiler-suit pocket and fell through a height of 25 feet onto steel floor, thus shattering the cap finial inner bush. Had no replacement, so stuck with Loctite 396 and it is going on. Do not want to buy a full kit to replace only this part. May be some retailer can give me one, but have not yet approached anyone.

In spite of the relatively heavier weight the pen has an excellent balance in writing. However posting the cap makes the pen too large and heavy for me to control. The iridium tipped nib of this kit is very smooth [ medium point]. I particularly like This kit, for the good looks and the nice shape of the section.
Maintaining the shine on the body is a regular problem as the copper tarnishes [ I personally do not like that dark look, see a photo] , so every time I pull out the pen from the underworld, I give it a good shine with brasso. Even the chrome plating on the decorative cap-band has started to look like gun metal after so many brasso polish.
Later if I have time, I would want to machine a bush and repair the cap finial. Somehown the extra work carried on the pen has created a bond, so this pen would stay in my collection..
 
Posted below are some photos and writing sample.
 
Put the pen on a notebook cover photo, liking the result ! Sample Writing using Sulekha Pink ink.
 
 
Tarnished in storage.
 
 
After Brasso polish :
 
 
This was the fat old original !! Good riddance.


Extra Long Converted Wood Pen- Revisit.

Wood Pen- Extra Long Converted Hero 332:

I have been studying the purchased readymade pens for a while but the few pens I had made myself kind of took a back seat ! This week , I have taken out some of them and would like to study them closely. Started off with this extra long pen, which is a cladded Hero 332.

At about 17.4 cm this pen is quite long, but does not feel that heavy as such, because both the inner Hero pen and the wood cladding are light-weight.

The background behind this pen is interesting. I had bought two fake Hero 332\s at Mumbai while joining my ship and these pens had stayed on with me. While on board I learnt about making pens on lathe by reading from the internet. Been lucky with the correct port sequence and managed to buy some kits from PSI and receive them at a US port and made some eleven pens. Some times later, the motor of the lathe machine burnt out and due to long sailing schedule , we  had to wait over a month to receive the replacement.  It is during this phase I went about making two pens, without lathe machine and without kits.

The wood was from the scrap from engine room, generally comes as packing material in the crates for spare parts. Whitish and soft , may be some low cost pine or similar hardwood. It is soft to turn and oily. That is as far as I can ID the wood. The grain in this wood is always faint.

I used the vertical drill to drill to create the pocket for inserting the parts of the original pen and created the square section by  hand  using sanding paper. The double taper of the pen body was inspired by the shape of a square file. It took me a lot of measurements along the full length to get the final shape.  The only part of the original pen  discarded was the clip as that clip would not match the new look. Instead I made one from a piece of scrap brass. With the pen body stuck inside the wood pocket, I wanted a different colour of the end finials and cap band. I used a mixture of saw-dust and araldite to make this. I also tried to make brass-dust inlay near the cap to barrel join as well as near the finials- but these did not come very prominent. Final finish was about 8 coats of CA and hand polished on grit 600 to grit 12000 micromesh in may steps. Because of the huge labour spent in making this unconventional pen I developed a special liking for the pen- it will always stay in my collection.

The mechanical part of the pen had no problem. Being a low cost fake, the filler mechanism was made of aluminum, recently changed this by taking a stainless steel one from a damaged pen. The nib is fine medium and required a little tuning. Now it is writing very smooth. 

I have made another square section pen during this time- will detail that sometime later. I call this technique "Cladding", and in future will use this to re-model less famous old pens. However experienced pen turners may not like the idea! Just a thought- this is unconventional after all.

Below there are some photos and a handwriting sample.


The Pen :


 Close up the attempted inlay work :


Safe Storing of the Pens

Pen storage is an important part of pen collection, but mostly neglected. my father had some 150 good pens of those days. All of these disappeared over the course of time- I would say mainly
because these were never kept in a dedicated storage place. Loosely kept here and there , all of them disappeared.
 
That said, another truth is that, low budget collector like myself would barely cough up the money for the pen itself, but as for the storage, it is a no no. Most of my pens are kept in the 48-pen Wallets made of faux leather as shown below, sourced from e-bay for around $ 30/- each. Though logically each of these is cost equivalent of two to three of my average pens, - every time I have actually purchased one there has been a long debate session within myself.
 
Recently, I took one of these to a local Bag-maker for a sample, this guy has agreed to make same ones for Rs. 400/- each. I have to actually see how is the quality, praying for now, at least let these be functional !
 
All other storage arrangements I checked over the internet , belong to the luxary end and are much more expensive. Some people have advised me to contact the people who manufacture Jewellery boxes in Bowbazar Kolkata and get some custom made. Somehow I have not yet walked up to those shops.!!

 
The Right Flap
 
The left Flap


                                          The Full View  with the separator and closed view.


Tuesday, 10 December 2013

UGLY and DIABOLO !!

 
UGLY and DIABOLO !!
 
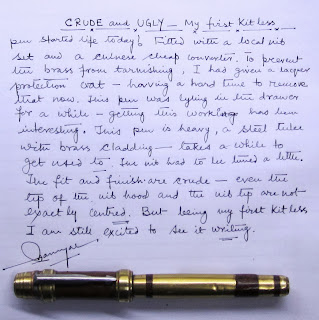
These are two funny handmade pens by me. Last night I sat down to complete them using various local components including nib , feeder  and converter. Finally got them working. Took a while to set up the nibs by tuning- these cranky looking unconventional pens write quite comfortably now. These would stay in my collection.
 
Both started off as kit-less pen attempts and I had machined the body while I was on ship.
 
 UGLY has a steel tube in brass cladding as the barrel. The barrel was step cut in three places and filled with a paste of saw-dust & Araldite - an experiment in inlay process! Only after trying I learnt how messy it all could turn! Cap on this pen is a wooden tube fitted with a solid heavy brass finial and a cannibalized clip. Cap to barrel fitment is a gentle slide fit , made by lapping. It works. The pen was lying in this condition for about five months, unattended. Last night I got inspired to  activate this pen. Fitted a local nib & feeder and a converter. This is working now.
 
DIABOLO is made from High compression resistant plastic, I found in scrap on board the ship, used for Hatch-cover compression pad. I had machined and made the body on board and as usual left like that for long. Last night I picked up a pen refill for Reynolds "Grippy" from my son's drawer, modded that a bit here & there and changed the nib. The final combo writes fine.
 
Both these pens are an experiment gone bad. But I enjoy these funny looking pens, which somehow write fine.
 
This post is only for fun. No serious pen turner would probably like to look at these!


Sunday, 8 December 2013

Four Vintage pens bought at Kokata yesterday.

I had paid a visit to Esplanade area to an old pen shop and  got these vintage pens for a total of Rs 2600/-, total Rs 2000/- for the two Pilot pens on top and Rs 600/- for the bottom two pens, one is a Senator and other is a Reynolds. All these pens are in excellent condition, and I was told these are from 1955 to 1960's time. For these pilots I could not get any reference to the model number but for the other two , did find a sketchy mention in FPN. However, the model numbers are not available. All these pens write very well. The top pilot pen has different colour section and barrel- I was told by the seller that this is how it was marketed those day, this is not a random mixing. The Senator pen shown in the top of the second photo, looks exactly same as the Pieere Cardin Kriss new pen I have detailed just a few days back- in FPN records I found an old transaction where an exact same pen was sold for $ 30/-. However the Senator experts advised that this one is not a true Senator as there are no model of Senator looking like this, to them it looks more like Chinese replica. My question remains- replica of which model-did Montblanc have a similar model, because the section looks Montblanc cloned. The Reynolds pen has a beautiful gold nib bearing the company logo, but again no model number any where- however one except description is sighted in FPN.  The two pens in the second photo came fitted with ink cartridges- I have fitted standard Jinhao converters from my stock. All these pens write well, in due course I would upload sample handwriting photos. Present job at hand is to positively ID these pens. If anyone knows, please let me also know.


New Arrivals Duke 209 and Hero 9215

These two pens arrived couple of days back, This is the second Duke 209 in our collection, the other being one in matte black colour and gold trim. I had detailed about that pen earlier in this blog, here is the link : 
 
The Hero 9215 arrived after about 2 months and a half or so, from a HongKong Supplier who had marketed this pen under a fancy description without the Hero 9215 name. Happens! E-bay has meanwhile removed the details from the archive, now there is no way to locate the seller and price of this pen. I faintly remember this pen was in the range of $12.0.
 
These pens are yet to be inked and tested. Will update with the ink test report and handwriting sample photo in due course.


Thursday, 5 December 2013

Sulekha Lever filled pen- Vintage Indian pen- restored and ink tested.

Sulekha Lever filled pen- Vintage Indian pen- restored and ink tested.


The pen had the filling system not working. I managed to oil up the lever mechanism and fit a ink sac cannibalized from a Her 329 and got the pen working normal. Found holding about 10 to 12 drops of ink, which is the capacity of a Hero/Wing sung sac.
The pen was found fitted with a new Panther nib that was a bit scratchy. Some good tuning with micromesh 12000 and the nib is quite smooth now, a little feedback still remains though. The writing test was quite enjoyable, fine ink-flow.
Though not known to me exactly, I read somewhere that the early Sulekha pens were modeled after British pen designs. I would need to find out more about this aspect. But the physical shape of this pen is very fascinating to my eyes. The barrel step down and continues further about 22 mm into the cap-holding thread and then comes the section about19 mm long. Other end of the barrel tapers down to almost a point, though this is not uniform conical-rather a straight side and a curved side wrapped around. I have seem some vintage pens photo showing similar curvature- there must be a name too for this peculiar profile. The cap is having a tall rounded finial and a very gradual taper to the cap-band. Overall look is that of a Classic old vintage. The clip is solid brass with ornate
"Shulekha "- lettering. There are those dual cap bands that nicely complete the picture. This old pen is really quite a  stunning looker.
Writing balance is excellent and the light comfortable feel ! Somewhat like holding a dip pen of olden days. I would need to get some good plastic polish to fully restore this pen. I am really grateful to the donor for this piece of history.


Baoer 79 Black - look alike of Montblanc starwalker

Baoer 79 Black :
Just received this pen today - a Montblanc Starwalker clone for just $ 6.98 from ebay. I have a Crocodile 232 as well and compared both, and inferred that  at $ 28.00 the crocodile 232 does not offer much extra. The pen comes in chrome trim and titanium color plated section. Grip curvature does add to the writing comfort. The nib was quite smooth and with a slight tuning on micromesh 12000 it has become silk smooth now. This is a brass body pen with matte lacquer finish, I find it reasonably light for a brass pen. Fit and finish are very good, no sloppy ends here. The acrylic cap finial makes the pen very attractive to me. Wring balance both with and without the cap posted is quite good. The steel nib is quite simple looking and stiff [ the one on the crocodile 232 is dual tone flex and ornate, but does not warrant the extra $20 though, in fact many other Baoer's come with two tone nibs.]. Usual converter filled system, standard international converter. I have attached a handwriting sample and some photos below. This pen would need a little time to get used to. Happy to get a Montblanc clone for just about 7 dollars.